Before You Begin - React Native for Android
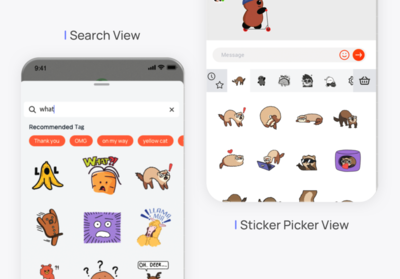
Welcome to Stipop Sticker guideline for React Native - Android. With a simple integration process, you can add optimized Sticker UI and over 150,000 stickers to your chat app. Follow the steps below to get started.
Requirements
- Android 4.1 (API level 16) or higher
- Java 8 or higher
- Support androidx only
- Gradle 3.5.4 or higher
Requirements
- Android 4.1 (API level 16) or higher
- Java 8 or higher
- Support androidx only
- Gradle 3.5.4 or higher
*This is a guideline using native modules.
Step 1: Download Stipop.json
2. Create Application
Once signed in, create your first application by providing a few details about your app.
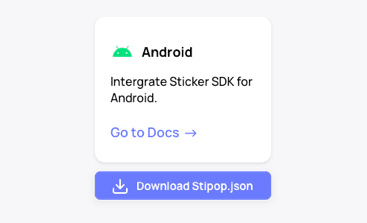
3. Download Stipop.json
You will see the Stipop.json file for Android on the Before You Begin page of your Dashboard account. You will need this file in step 3.


Step 1: Download Stipop.json
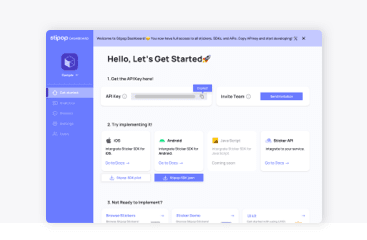
1. Sign up on Stipop Dashboard
Go to the Stipop Dashboard and create an account.
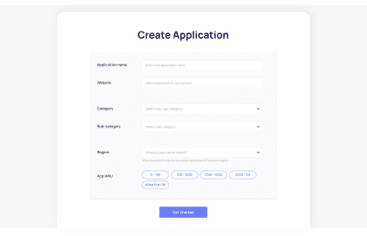
2. Create Application
Once signed in, create your first application by providing a few details about your app.
3. Download Stipop.json
You will see the Stipop.json file for Android on the Before You Begin page of your Dashboard account. You will need this file in step 3.
Step 2: Include the SDK into your project
1. Add the JitPack repository to your build file
Add it to your root build.gradle at the end of repositories:
allprojects {
  repositories {
    maven { url 'https://jitpack.io' }
  }
}
2. Add the dependency
Add it to your app level build.gradle at the end of dependency:
Check out the Stipop Android SDK Release Notes . We recommend using the latest release.
dependencies {
  /* If your application's min API level is under 21, use 0.7.4 version. */
  implementation 'com.github.stipop-development:stipop-android-sdk:0.9.3-beta.4'
  // This makes your emoticon move.
  implementation 'com.facebook.fresco:animated-gif:2.5.0'
  // You should use 'MaterialComponents' style theme.
  implementation 'com.google.android.material:material:1.6.1'

  // Optional //
  // Maybe you need to extend 'MultiDexApplication' at 'Application' class.
  implementation 'androidx.multidex:multidex:{version}'
  // You additionally need to this library, if your project does not configure 'Kotlin'.
  implementation 'org.jetbrains.kotlin:kotlin-stdlib:{version}'
}
Step 3: Setup Stipop SDK
1. Setup Stipop.json
Step 1: Create assets folder in app>src>main if you don't have one.
Step 2: Move the Stipop.json file you downloaded from the Dashboard into the assets folder.
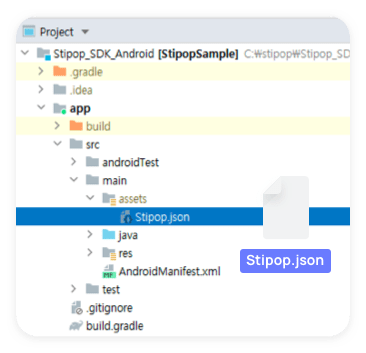
Step 1: Create assets folder in app>src>main if you don't have one.
Step 2: Move the Stipop.json file you downloaded from the Dashboard into the assets folder.
Stipop.json contains your API Key. Keep it private. If it gets leaked, make sure to regenerate a new one immediately.
2. Make or update your application class
Add 'public static FragmentActivity activity;' and Call 'Stipop.Companion.configure(this, null, null);' at application class to initialize the SDK from 'Stipop.json' file. If you want to know about 'Stipop.configure', refer to Optional Settings - Configure
1
2
3
4
5
6
7
8
9
10
11
12
import io.stipop.Stipop;

public class MainApplication extends Application implements ReactApplication {

    @Override
    public void onCreate() {
        super.onCreate();
        ...
        // Stipop-android-SDK configure.
        Stipop.Companion.configure(this, null, null);
    }
}
3. Update AndroidManifest.xml
Update your 'AndroidManifest.xml' to specify application class.
Make sure your application includes 'INTERNET' permission to perform network operations.
and Stipop Android SDK's allowBackup value is false. so, if your app's allowBackup value is true, please add tools:replace="android:allowBackup".
1
2
3
4
5
6
7
8
9
10
11
12
13
14
15
16
17
<?xml version="1.0" encoding="utf-8"?>
<manifest xmlns:android="http://schemas.android.com/apk/res/android"
xmlns:tools="http://schemas.android.com/tools"
...
>

    <uses-permission android:name="android.permission.INTERNET"/>
    ..
    <application
        android:name=".MainApplication"
        android:allowBackup="true"
        tools:replace="android:allowBackup"
        ...>
          <activity />
          ...
    </application>
</manifest>
4. Update styles.xml
Update your style to MaterialComponents.
1
2
3
4
5
6
7
8
9
10
<resources>

<!-- Base application theme. -->
<style name="AppTheme" parent="Theme.MaterialComponents.DayNight.NoActionBar">
    <!-- Customize your theme here. -->
    <item name="android:editTextBackground">@drawable/rn_edit_text_material</item>
</style>

</resources>